


Create Announcements
Discover how to create an announcement using a powerful text editor and share it with your users.
Overview
Announcements are one-way notices that your school publishes to everyone at once — term dates, school notices, class reminders, event details, and more. Unlike messages, an announcement is not a conversation: it is published by the school and read by its audience.
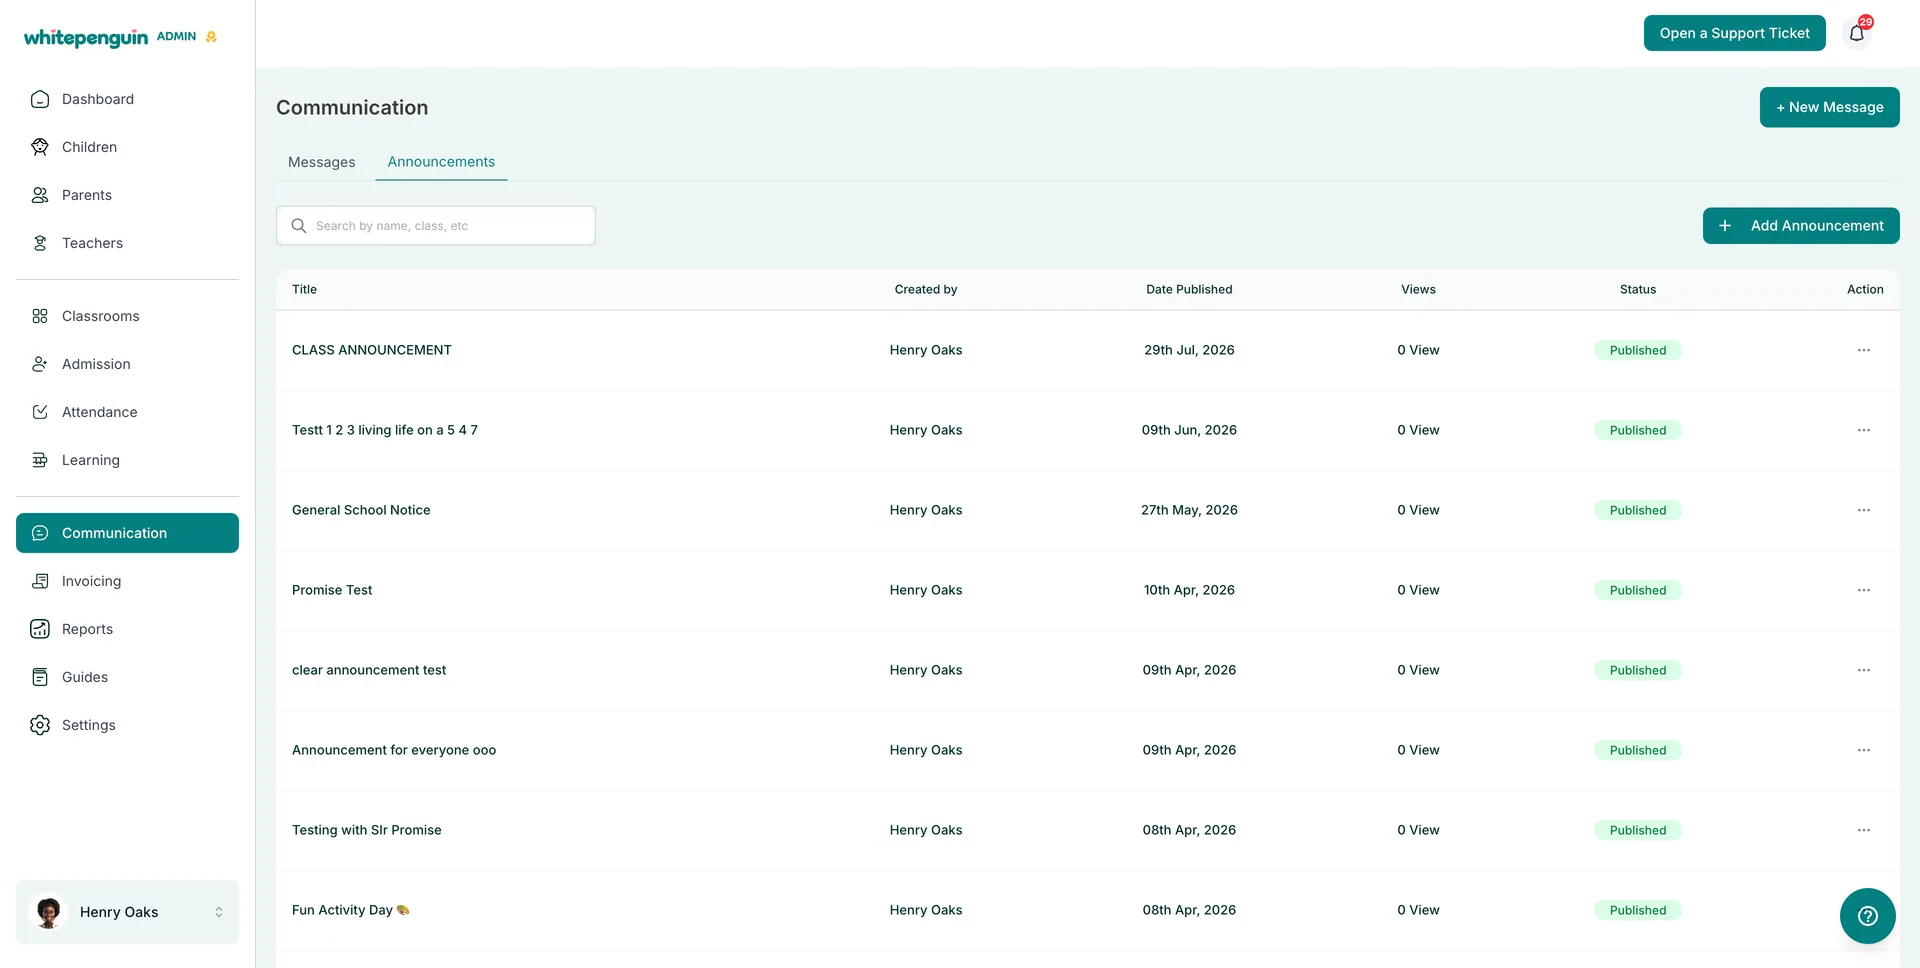
Announcements live on the Announcements tab of the Communication section:
| Tab | What It Shows |
|---|---|
| Messages | Private one-to-one conversations with parents and staff. |
| Announcements | Every announcement created by the school, with its author, publish date, views, and status. |
The announcements table shows the following columns:
| Column | What It Shows |
|---|---|
| Title | The headline of the announcement. |
| Created by | The user who wrote it. |
| Date Published | The date it went live. |
| Views | How many people have opened it. |
| Status | Published, Draft, or Archived. |
| Action | The ⋯ menu with View, Archive, and Delete. |
How to Access
-
Admins
- Click Communication in the left sidebar.
- Open the Announcements tab.
- Click + Add Announcement (top right) to write a new one, or use the ⋯ menu on any row to view, archive, or delete an existing announcement.
-
Teachers
- Click Communication in the left sidebar.
- Open the Announcements tab to read what the school has published.
- Teachers can view announcements by default. Creating, editing, archiving, or deleting depends on their custom role.
-
Parents
- Sign in to the Parent Dashboard and click Communication.
- Open the Announcements tab.
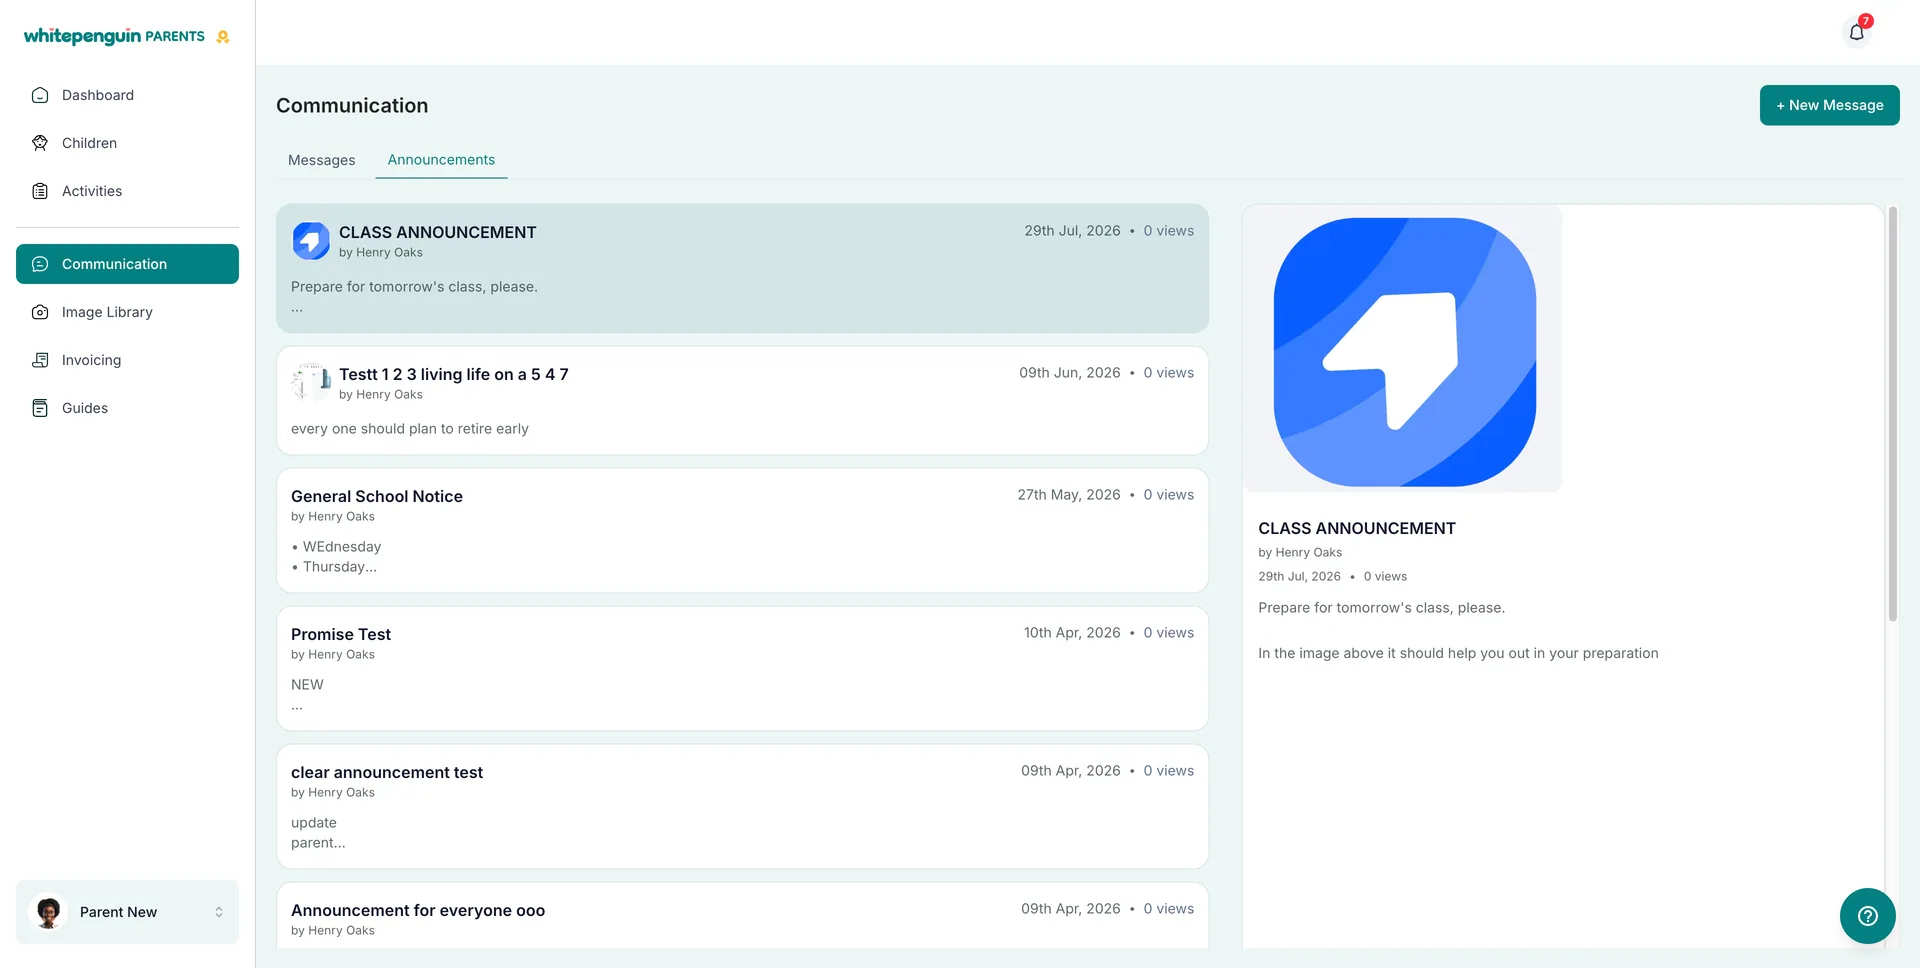
- Announcements appear as cards showing the title, author, date, and view count — click one to read the full announcement in the panel on the right.
Roles & Access
Access is based on custom roles. Your school admin creates custom roles for all users and controls exactly which permissions each role has — View, Edit, Create, and Delete — for every section of the system, including Communication.
| User | What they can do with announcements |
|---|---|
| Admins | Create, View, Archive, and Delete announcements. |
| Teachers | View only by default. With the right custom role, they can also Create, Edit, Archive, and Delete. |
| Parents | View only — parents read announcements but cannot create or reply to them. |
For staff users, each action maps to a permission on their custom role:
- View permission for Communication — read the Announcements tab.
- Create permission — write and publish new announcements.
- Edit permission — update an announcement after it is created.
- Delete permission — archive or permanently remove an announcement.
Where to manage roles: Go to Settings → Roles & Permissions, then click + Create Role to build a new custom role, or select an existing role to toggle its permissions. Super Admin permissions are fixed and cannot be edited.
How to Create a New Announcement
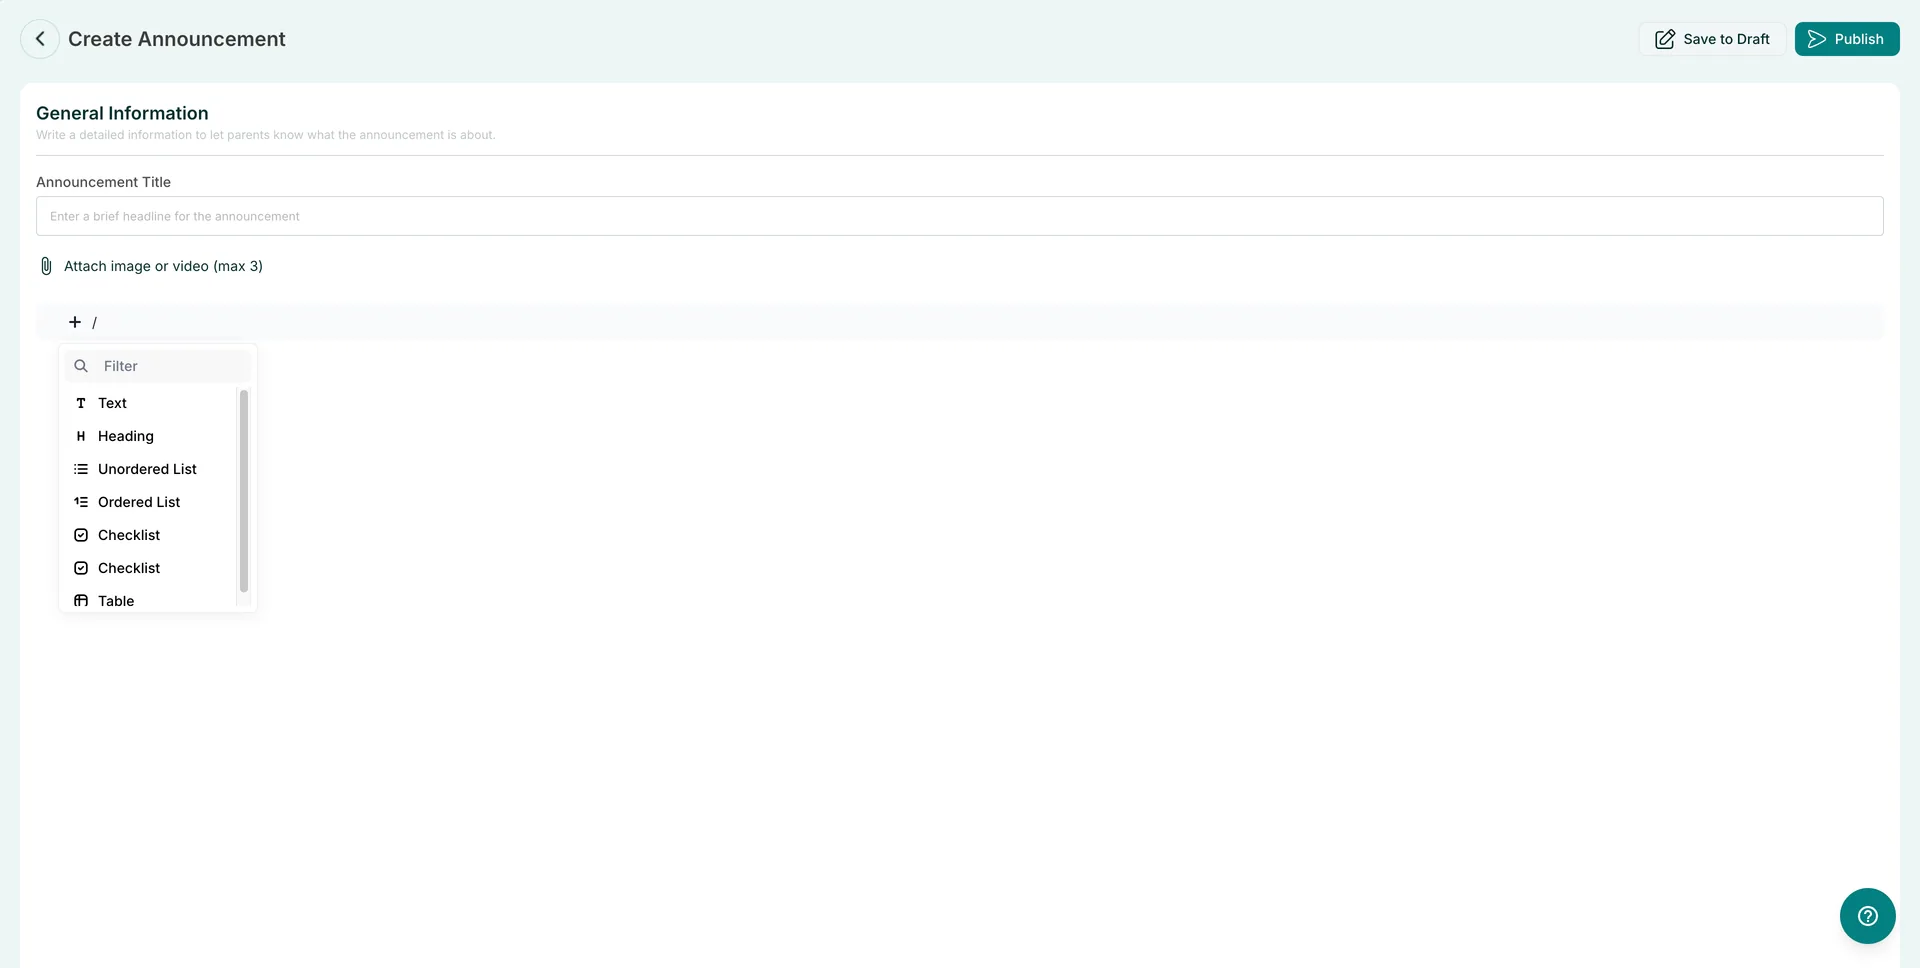
From Communication → Announcements, click + Add Announcement. The Create Announcement page opens with a General Information section:
-
Announcement Title
- Enter a brief headline for the announcement.
- This is the text shown in the announcements list and in the parent's feed, so keep it short and specific.
-
Attach image or video (max 3) — optional
- Click the attachment link to add up to 3 images or videos.
- Attached media appears at the top of the announcement when it is opened.
-
Announcement body
- Click the + button or type / on the content line to open the block menu.
- Use the Filter box to search for a block type, then select it and start typing.
- Add as many blocks as you need to build the full announcement.
-
Save to Draft or Publish
- Click Save to Draft (top right) to keep working on it later — it is not visible to the audience yet.
- Click Publish to send it live. It then appears with a Published status, along with its publish date and view count.
- Use the back arrow (top left) to leave the editor.
Content Blocks You Can Use
The announcement editor is a block editor — press / (or click +) and choose a block:
| Block | Use it for |
|---|---|
| Text | Normal paragraphs of information. |
| Heading | Section titles that break up a longer notice. |
| Unordered List | Bullet points, such as a list of items to bring. |
| Ordered List | Numbered steps or a sequence of dates. |
| Checklist | Things parents need to tick off or prepare. |
| Table | Structured details, such as a timetable or fee breakdown. |
The block list scrolls, so use the Filter search box at the top to jump straight to the block you want.
Managing Existing Announcements
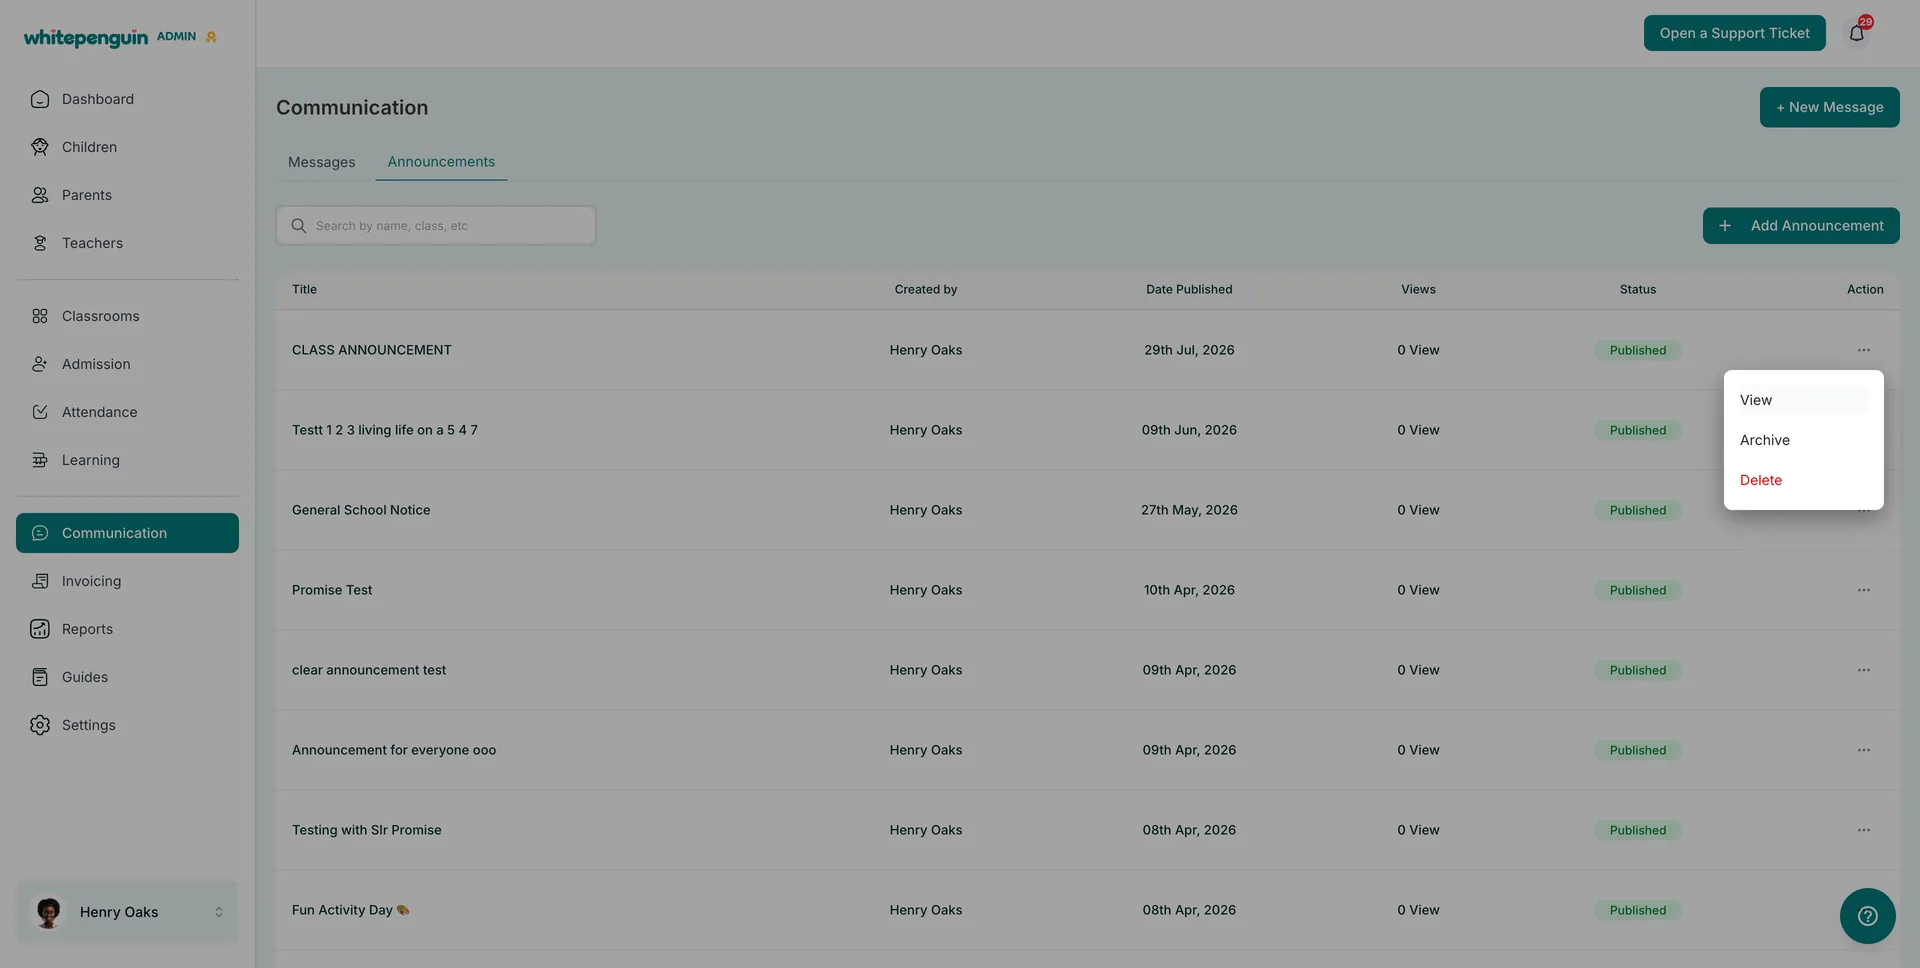
Click the ⋯ icon in the Action column of any row:
| Action | Description |
|---|---|
| View | Opens the announcement exactly as the audience sees it, including attachments. |
| Archive | Removes the announcement from the active list while keeping the record. |
| Delete | Permanently removes the announcement. This cannot be undone. |
Delete is permanent. If an announcement is simply out of date, use Archive instead — it clears the list without losing the announcement or its view count.
Use the search bar above the table (Search by name, class, etc) to find an announcement instead of scrolling.
What Parents See
On the parent side, Communication → Announcements shows a feed of announcement cards:
- Each card shows the title, by [author], the date, the view count, and a short preview of the body.
- Any attached image appears as a thumbnail on the card.
- Clicking a card opens the full announcement in the panel on the right, with the image at the top followed by the complete text.
- Parents can read announcements but cannot reply to them — replies happen through Messages.
Tips
- Write the headline for a busy parent. The title is all most people read in the feed — make it specific, like Mid-Term Break: 12–16 October.
- Type / instead of hunting for the + button. It is the fastest way to add a heading, list, checklist, or table while you write.
- Lead with an image. Attached media appears at the top of the announcement, which makes it far more likely to be opened.
- Use Save to Draft freely. Nothing is visible to parents until you click Publish.
- Check the Views column after publishing to see how many people actually opened the announcement.
- Archive, don't delete. Archiving keeps your list tidy while preserving the announcement and its history.
- Use Messages for anything that needs a reply. Announcements are one-way by design.
FAQs
Admins can create, view, archive, and delete announcements. Any other user can create them if their custom role includes Create permission for Communication.
By default, teachers can only view announcements. If their custom role includes the matching permissions, they can also create, edit, archive, and delete them.
No. Parents can view announcements only. If a parent needs to respond, they can start a conversation from the Messages tab instead.
The announcement is saved but not published, so no one else can see it yet. You can reopen it later and publish when you are ready.
Archive hides the announcement from the active list but keeps the record. Delete removes it permanently and cannot be undone.
Up to 3 images or videos per announcement, added from the Attach image or video (max 3) link on the Create Announcement page.
Yes. Click + or type / to insert Text, Heading, Unordered List, Ordered List, Checklist, or Table blocks, and use the Filter box to find a block quickly.
The number of people who have opened that announcement. It stays at 0 View until someone reads it.
An announcement is a one-way notice published to your audience on the Announcements tab. A message is a private one-to-one conversation on the Messages tab.
Last updated on